|
Part II: Walkthrough
A. Aliahan
The game opens with your mother waking you up and sending you off to meet the king of Aliahan. Simply follow the path up to the castle, upstairs to his highness. He will give you your quest, to slay the Archfiend Baramos, and will direct you toward Luisa’s eatery to recruit some allies with 50 gold in your pocket.
The decisions you make in Luisa’s (located on the left side of town, above the exit) will affect the rest of your game. I’ll be going with the “default” party of Hero/Soldier/Pilgrim/Wizard, because it seems to be the party that ends up most balanced as it progresses throughout the game. There are other alternatives listed on the previous page if you’re interested in taking a different strategical route.
If you’re unsatisfied with the default names offered by Luisa, head upstairs and speak with the man behind the desk to register some new ones. You’ll need to create four characters; three to take with you, and one Merchant who will come in handy later on.
The first thing we need to do is bulk up those 98-lb level 1ers. Step outside Aliahan and beat the crap out of each and every Slime and Black Raven you come across. Your Pilgrim will learn Heal at level 2, enabling you to stay out in the field much longer. If you’re good, you can all hit level 3 before needing a nap. You’ll find that the Hero levels up slower than the rest of the party, but this is to counterbalance his inability to change class and resume gaining experience from level 1.
| Aliahan Goods & Services |
| Priest |
Yes
|
| Inn |
8
|
| Item Shop |
Medical Herb
Antidote Herb
Wing of Wyvern |
8
10
25
|
| Armory |
Cypress Stick
Club
Copper Sword
Clothes
Wayfarer’s Clothes
Leather Armor
Leather Shield |
5
30
100
10
70
150
90
|
The townspeople say that an old man stole a Thief’s Key from a guy named Bakor. The old man is currently holed up on the roof of the Tower of Najima to the west, accessible through a cave just southwest of it. Guess where we’re headed! Note that you can return to your mom’s house for a free healing whenever you wish, so adventure and level at your leisure. A safe bet would be to have everyone around level 5 before completing the tower.
Despite having to rely on the weakest equipment in the game, there’s no great hurry to upgrade your weapons and armor just yet. There’s some free equipment in the tower that can be put to use. It’s not like your guys really need to be pimped out for the first dungeon, either. It’s so beginner-friendly that it has a damn inn built right into the basement, so enter without fear. The tower’s only threat is the Babbles’ ability to poison you, but this can be countered by taking a few Antidote Herbs with you.
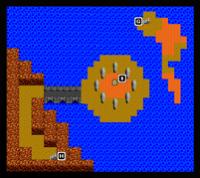
B. The Thief’s Key
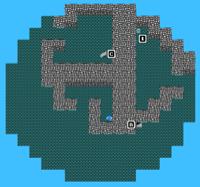
To access the tower (that’s it sitting on the island in the bay) head west across the bridge and then south. This cave, which leads to the tower, is populated by some reasonably strong monsters, but nothing a level 4 or 5 party shouldn’t be able to take care of.
| The Cave on Promontory |
| B1 |
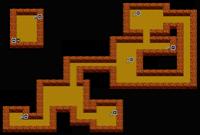 |
[1] Medical Herb
[2] Wayfarer’s Clothes
[3] 16 G
|
Grab the treasure (your Wizard could use those Wayfarer’s Clothes) and head upstairs to enter the tower proper.
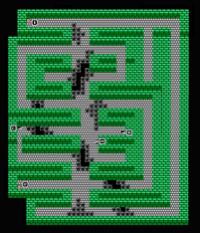
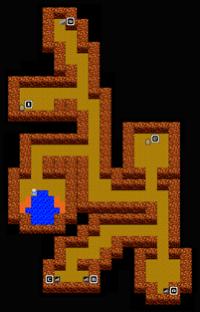
| The Tower of Najima |
| B1 |
 |
[1] 32 G
[2] Medical Herb
[3] Agility Seed
[!] to Aliahan castle
|
| 1F |
 |
|
| 2F |
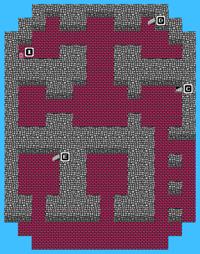 |
[1] 40 G
|
| 3F |
 |
[1] Leather Helmet
[2] Wing of Wyvern
|
| 4F |
 |
[!] Old man
|
A pretty straightforward first dungeon. The first floor’s stairway [B] leads to a very convenient inn (it’ll run you a whole 8 gold), while [C] will take you up to the second floor. Follow the map to the treasure, the most useful of which being the leather helmet. You might want to just run from any Masked Moths you encounter, as they have a tendency to blind your entire party, and you probably don’t want to waste all of your Wizard’s MP taking them down. The Parry-cancel trick is useful when trying to escape battle.
Once you get the key from the old man on the top floor, exit his room and jump right off the edge of the tower. Instead of using that wyvern wing you picked up in the tower to warp back to Aliahan, walk back into the tower and descend to the basement. Head north, hang a right, and use your shiny new Thief Key to open the door you see at the next corner. Open the chests for an herb and an Agility Seed. From here you can make your way to that map’s [!] in the lower right for a quick shortcut to Aliahan Castle.
C. The Magic Ball
Walk northwest to Reeve. Once in the village, unlock the door in the northeast corner of town and go upstairs to receive a Magic Ball from the old man. This item will allow us access to on of the game’s main continents. Be sure to purchase a Chain Sickle from the weapon shop before you go. Equip it on your Hero and transfer his Copper Sword to your Soldier. If you have enough gold, however, it would be wise to buy a second Chain Sickle for your Soldier.
| Reeve Goods & Services |
| Priest |
Yes
|
| Inn |
8
|
| Item Shop |
Medical Herb
Antidote Herb
Fairy Water
Wing of Wyvern
Turban |
8
10
20
25
160
|
| Armory |
Magic Knife
Thorn Whip
Chain Sickle
Training Suit
Leather Armor
Leather Shield
Leather Helmet |
200
320
550
80
150
90
80
|
The Explorer’s Handbook recommends that your party reach level 8 before proceeding, but a weaker party armed with a couple of Chain Sickles will have little trouble in reaching the main continent.
Save your game and store your Agility Seed in the vault at Aliahan if you like, then exit and proceed in the direction of Reeve. Once you come around the lake, follow the mountains eastward and then south until you come to a shrine. You can enter if you want to (an old man lives inside), but we will eventually need to head north to the Cave of Enticement, accessible from a hidden entrance one space below the small body of water encircled by trees. Once you enter, circumnavigate the lake and fall down the hole at the top.
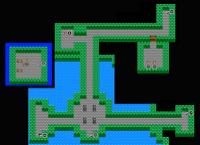
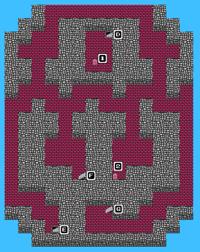
| The Cave of Enticement |
| B1 |
 |
[!] Weak wall
|
| B2 |
 |
[1] Antidote Herb
[2] Magic Knife
|
| B3 |
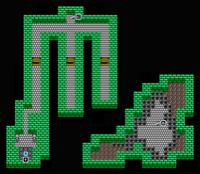 |
|
Begin by heading west until you come to an old man and a barricaded pathway. Stand in front of the southern wall and use the Magic Ball to force your way through. Upon descending to B2, you’ll notice that this cave is riddled with pitfalls, which will all dump you into an empty room on B3. Avoid them using the map, making sure to grab the Magic Knife out of one of the chests for your physically challenged Wizard.
Enemies here are a bit tougher, but you’ll make it through if you follow the map and make good use of your magic. Now that the Hero has Heal, you can take a little more punishment. Spiked Hares pose a threat, as they can put the whole party to sleep. The Wizard’s Icebolt spell can take them out in one shot, if you feel like fighting it out.
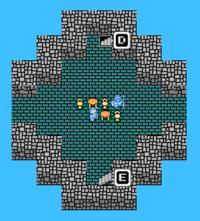
Once you make it down to B3 via staircase [C], you’ll find yourself at the north end of a three-way split in the path. Take the path on the left and unlock the big Thief’s Door to reach a travel door leading to the kingdom of Romaly.
D. Romaly
Walk through town (taking a brief rest at the inn) and into the castle. Speak to the healer on the left if anyone needs to be revived. Go upstairs to speak with the king to save your game and receive your next quest: retrieving the stolen crown. The king offers no reward for fetching his crown other than the title of “true hero,” so there’s not a whole lot of incentive on the narrative side of things. However, the Golden Crown also happens to be the best helmet in the game for the Wizard, so if you don’t mind blowing off the king of Romaly, hang onto the crown for a nice little defense bonus.
| Romaly Goods & Services |
| Priest |
Yes
|
| Inn |
12
|
| Item Shop |
Medical Herb
Antidote Herb
Fairy Water
Wing of Wyvern
Full Moon Herb
Iron Apron
Leather Helmet |
8
10
20
25
30
700
80
|
| Armory |
Chain Sickle
Iron Spear
Broad Sword
Leather Armor
Shell Armor
Chain Mail
Bronze Shield |
550
750
1500
150
300
480
180
|
| Monster Arena |
Ticket |
60
|
You might notice that Romaly has a Monster Arena, accessible through the steps in the item shop. This can be a fun way to raise some quick cash if you don’t mind reseting to erase your losses. Walk up to the guy behind the counter on the left and purchase a ticket. They’re 60G here (other arenas are more expensive) meaning that if you pick the monster that wins, you’ll win that monster’s odds x 60. Take this fight, for example:
|
Masked Moth |
3.8 |
|
Scorpion Wasp |
2.1 |
|
Masked Moth |
3.9 |
If you were to bet on Masked Moth A, and he wins the fight, your payout will be 3.8 x 60, or 228G. The trick is to bet on a monster whose odds aren’t too unrealistic, because the higher the odds on a monster, the lower its chances of winning. You’ll see weak monsters with odds of 20+ going up against real beasts, but it’s not impossible for them to win. Battles can play out any number of ways. If the two tougher monsters end up just wailing on each other for most of the battle until one of them dies, all it takes is for the weak one with the huge odds to slap it once or twice. Sometimes a weak monster will stick a crippling enfeebling spell and essentially incapacitate a tougher one. The Monster Arena can be fun, but be careful how much you end up betting, lest you waste your time and money. Save beforehand.
There’s a clue to Kandar’s whereabouts inside the castle. A prisoner kept in the western tower mentions that Kandar has moved his base of operations to the Tower of Shanpane. You’re probably itching to storm the tower and reclaim the crown for your buddy the king, but Kandar and his men put up quite a fight. It’ll be necessary to fight around a bit to gain some levels and earn enough gold to afford some of the nice new weapons and armor available to you.
Before you go splurging in the Romaly armory, be aware that there is a village in the hills to the north with some much better stuff. If you’re rolling with the “default” party, you’ll only need to pick up the Chain Mail (for your Pilgrim) and two Leather Helmets (for your Soldier and Pilgrim) in Romaly, as everything else we’ll need is also available in the next town. If you’ve been enjoying some success at the monster arena and want to start outfitting your party, pick up a Broad Sword for your Hero, who can then hand his Chain Sickle down to your Pilgrim for some nice extra damage until you buy him an Iron Spear.
One of the castle guards clearly lays out your next destination: “There are terrible monsters in the east… But first it’s best to set out for the north to try out your skills.” Once you’ve rested up and feel comfortable with your equipment, exit Romaly and head north to the village of Kanave. It’s a short walk, but at your level and current state of equipment, some of the monsters can be nasty. Have your Wizard throw out an Icebolt spell every round to bring them down fast.
E. Kanave
It’s the little village at the four-way intersection in the mountains. You can’t miss it!
| Kanave Goods & Services |
| Priest |
Yes
|
| Inn |
16
|
| Item Shop |
Medical Herb
Antidote Herb
Fairy Water
Wing of Wyvern
Full Moon Herb
Iron Apron |
8
10
20
25
30
700
|
| Armory |
Iron Spear
Broad Sword
Iron Claw
Half Plate Armor
Fighting Suit
Bronze Shield
Iron Shield |
750
1500
770
1100
800
180
700
|
Kanave is going to be our base of operations for a little while. It’s centrally located between two towns and a dungeon, and has a wide array of useful equipment. On top of that, the tough monsters surrounding it will help in raising the necessary cash.
Here’s what we’re shooting for from Kanave:
|
Hero |
Broad Sword
Half Plate Armor
Iron Shield |
1500
1100
700 |
|
Soldier |
Broad Sword
Half Plate Armor
Iron Shield |
1500
1100
700 |
|
Pilgrim |
Iron Spear
Bronze Shield |
750
180 |
|
Wizard |
Poison Needle |
0 |
|
Total |
|
7530 |
You read that right, the Poison Needle is a nice little freebie. One of the villagers mentions that the item shop used to sell them… Maybe they weren’t able to liquidate their entire stock? Enter Kanave during nighttime and use your Thief’s Key to gain access to the item shop’s back entrance. Tiptoe around the sleeping shopkeep and nab the Poison Needle and a Club from the two chests. The Poison Needle does very low damage ordinarily, but will ocassionally strike an enemy’s weak point for an instant kill. Its normal accuracy is very good regardless, which makes it a nice weapon to use when battling metal foes, whose HP must be whittled away one at a time. The instant kill effect doesn’t kick in terribly often, so it’s your call if you’d rather use it over the mediocre damage of the Magic Knife.
In any event, hunt around for a bit and try to raise some gold. If you intend to pick up everything on the above list, you should be able to afford everything when your party is about level 12. With those levels and that equipment, Kandar will get trounced. Head west from Kanave, veer southwest and cross a bridge. Continue southwest to reach the tower.
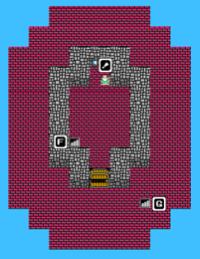
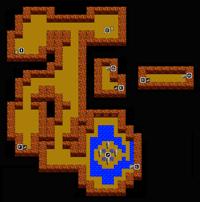
| The Tower of Shanpane |
| 1F |
 |
[1] Wing of Wyvern
|
| 2F |
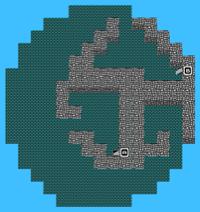 |
|
| 3F |
 |
[1] 384 G
|
| 4F |
 |
[!] Kandar
|
| 5F |
 |
|
| 6F |
 |
|
Not a whole lot of treasure here, but some of the monsters can be major annoyances. Magic-heavy parties will find themselves silenced by the Humanabats’ Stopspell, while any party can fall prey to the Poison Silkworms’ party-wide poison breath. The Pilgrim will learn Antidote at level 12, so at least you don’t need to stock up on Antidote Herbs.
Follow the map up to the 5th floor, at which point a couple of Kandar’s henchmen will spot you and run upstairs to the top floor to inform the big guy himself. Follow them up, fall prey to the oldest trick in the book, and reclimb the stairs to the 6th floor. Buh?! How can a thief of such girth escape without being seen? By walking off the upper ledge. Drop off and find yourself right in front of Kandar and his men.
This fight is easy if your equipment is up to date, but it’s a complete joke if your Wizard has the Bang spell. Because Kandar and his men are all separate groups of enemies, cast Bang to hit everyone. Have the Hero and Soldier concentrate on the same henchman until they’re all down, then go after Kandar himself. Parry-cancel works wonders. You can do it!
You’re forced to show Kandar mercy, but for your efforts are rewarded with the Golden Crown. Equip it on your Wizard if you have one, or if you decide to do the generous thing, take a dive off the edge of the tower and have the Hero cast Return to get back to Romaly in a hurry in order to return the crown.
Back at the castle, the king is overjoyed. Perhaps overoverjoyed, as he transfers his power to you as a reward for retrieving the crown. Don’t think you can turn his generosity down! In the blink of an eye, your Hero grows a stylish beard and assumes the throne. Feel free to wander around your new kingdom and enjoy lording your authority over the peasants. Attempt to leave, however, and the guards obstruct your path, spouting some “for your own protection” garbage.
If for some reason you grow bored with the monotony of royal life, you can find the old king living it up in the Monster Arena. Explain to him your situation and he’ll be more than happy to exchange places with you once again. Once you’ve reunited with your crew, Return to Kanave and head northwest to the village of Noaniels.
F. Noaniels and the Dream Ruby
After entering Noaniels, you’ll that notice something is amiss. Everyone’s asleep! Well, not everyone. Seek out the old man in the house in the village’s southwest corner. He’ll explain that the only way to wake the citizens of Noaniels is to appeal to the Elf Queen by returning her Dream Ruby. The Elf Village is just a brief walk to the west, so we might as well get the story straight from the queen herself. Exit Noaniels and head west until you come to a patch of bushes in the forest and a cave to your south. Ignore the cave for the time being and enter the brush.
Welcome to the racist Village of Elves! All of the townspeople will shun you, and the item shop will have nothing to do with your rotten human money… for now. Queenie will explain that a human man ran away with her daughter Anne, taking with them the elves’ Dream Ruby. The couple absconded to the cave to the south, which is our next destination.
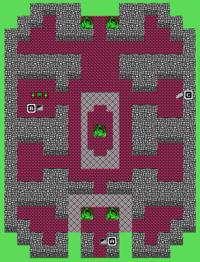
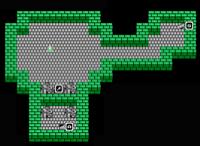
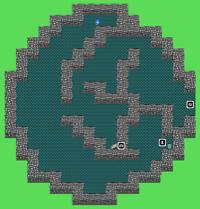
| The Cave West of Noaniels |
| B1 |
 |
[1] Wing of Wyvern
[2] 288 G
|
| B2 |
 |
[1] Magic Knife
[2] Strength Seed
[!] Recovery Spring
|
| B3 |
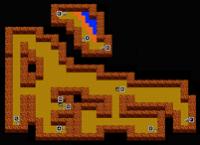 |
[1] Acorns of Life
[2] 80 G
[3] Fairy Water
[4] 48 G
[5] 224 G
|
| B4 |
 |
[1] Dream Ruby
|
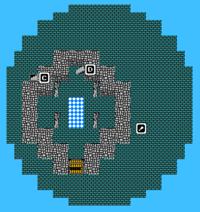
The monsters in here are a step up from the tower, but the only really deadly ones are the aptly named Deadly Toadstools, which, in addition to their ilk’s standard sleep breath, are also able to put members of your party to sleep simply through their regular attacks. It’s not uncommon for a quad of shrooms to completely wreck what once was a healthy party, so show no mercy on these guys. As there is no boss in this dungeon, have your Wizard take the offensive with the appropriate spells in every battle. Just be sure to save 8 MP to cast Outside once you find the ruby.
The first floor presents you with three staircases, but only one, [C], leads to the Dream Ruby. But be sure to head down [A] first to grab the Acorns of Life on B3. By taking [A] to [D] and grabbing the chest, you can take [E] to quickly loop back around to [B], with [C] right next to you. The old man on the first floor mentions that this cave houses a recovery spring. Hmm!
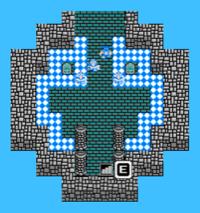
Once you arrive on B2 via [C], you’ll notice four stone structures and five shiny plates in the center of a small spring. Follow the spring to the center and step on the central tile. Found the recovery spring! Take some time to effortlessly level, if you want. The spring can be reused as many times as you like. Once you’re done, be sure to grab the treasures to the north before continuing on to B3 via [F].
The remainder of the cave is easy enough. Sweep B3 for treasure, ultimately arriving at B4 via [H]. Ignore [G]. Once you retrieve the Dream Ruby and Anne’s note from the chest on B4, have your Wizard cast Outside, and then walk north to the Elf Village.
Turns out that the Elf Queen takes the news of Anne’s demise rather hard, developing a sudden sense of guilt for her deeds against the humans. She relenquishes her bag of Wake Up Powder to the party, yet somehow still sees nothing wrong with treating you like crap. It’ll be a while before we’re able to talk freely with the elves. For now, take the powder east to Noaniels and select it from your inventory once inside the town. The citizens awake, a bit tired, but no worse for wear.
| Noaniels Goods & Services |
| Priest |
No
|
| Inn |
20
|
| Item Shop |
Fairy Water
Wing of Wyvern
Full Moon Herb
Spider’s Web
Wizard’s Wand
Cloak of Evasion |
20
25
30
35
1500
2900
|
Do your Wizard a favor and pick up a Cloak of Evasion to replace his tattered old Wayfarer’s Clothes, but don’t bother with the Wizard’s Wand. It casts Blaze in battle for free when used as an item, but Blaze does crappy damage and costs only 2 MP anyway, so it’s not really worth the price, especially with all the expensive new equipment coming up.
The old man in the northwestern house mentions the town of Assaram (teehee) and the Magic Key, so there’s our next lead. You don’t need to stay at the inn (unless your Hero or Wizard has less than 8 MP), but the people on the second floor do make mention of Ortega, if you’re keeping up with the adventures of your father. Assaram is to the east of Romaly, so Return there and rest up. Follow the coast east, cross the bridge, and finally head southeast. You’ll find Assaram nestled in the corner next to the mountains and the ocean.
|

 Dragon Warrior III: A Walkthrough in Three Acts