
|
🎙️ The Crunk Games Story
|
 |
|
||||||||||||||||||||||||||||||||||||||||||||||||||||||||||||||||||||||||||||||||||||||||||||||||||||||||||||||||||||||||||||||||||||||||||||||||||||||||||||||||||||||||||||||||||||||||||||||||||||||||||||||||||||||||||||||||||||||||||||||||||||||||||||||||||||||||||||||||||||||||||||||||||||||||||||||||||||||||||||||||||||||||||||||||||||||||||||||||||||||||||||||||||||||||||||||||||||||||||||||||||||||||||||||||||||||||||||||||||||||||||||||||||||||||||||||||||||||||||||||||||||||||||||||||
|
July 12th, 2003 | Feature | Master System
Page 2 Contents IV. The Walkthrough A. Alis sets outAfter the riveting intro, Alis finds herself in front of her home, a cozy little yellow dome with one room. The first thing you should do is wander up into the little cave to your right (the “warehouse”) to fetch some cash and get a feel for the 1st person POV of the dungeons. 1. Map: Warehouse
Once you’ve made it back outside, head on over to the Armory (shop on the far left of the trio of shops) and purchase the Leather Shield (DEF+3) for Alis. Once you’ve done this, wander into the blue house in the northwest part of town. Nekise, a man who knew your brother Nero, will give you a Laconian Pot at no cost. He also tells you that the man named Odin resides in the port town of Scion. The pot and information won’t come into play just yet, but it is important that you visit a woman called Suelo. Suelo lives in the yellow house just below yours. Suelo makes the game a bit easier by healing your entire party for free during the game. You may return anytime you wish. Her method of restoration is much quicker and cheaper than having to heal everyone individually at the hospitals. Now that you’re fit to cause a ruckus, go out the east exit. We need to raise a bit of money to get the adventure going.
Upon reaching the outside world, you will see two other towns and a big wall. Actually, the location in the upper left is a spaceport, accessible only after you’ve purchased a roadpass (done in the port town of Scion later). The lower area, Parolit, is a residential area like Camineet. You can find some strong weapons here, but nothing very affordable right now. If you like, head on in to check out the shops and speak with the residents.
Other enemies in the area include Deadtrees to the west and Wingeyes to the north. These enemies aren’t too tough and provide adequate exp. and meseta, but beware. It’s a long hike out to their nests, and thanks to PS’s unpredictale and erratic formulae, anything can go wrong. Wait till you’ve shot up a few levels before tackling them. It’s also feasible to hunt the Maneaters to the south near Medusa’s Cave, but you run the risk of encountering a stray Werebat or Skull-En, which is pretty much an assured game over. In fact, your best bet at this point would be to wail on the scorpions near the entrance to the wall. Assuming, of course, you’ve done some leveling up already with the Sworms. Your first job should be to level up and raise 75 mesetas for that Iron Sword in Parolit. Keep in mind that you can return to Camineet at any time for a free restoration by Suelo. Don’t forget to save often. You’ll kick yourself if you earned 300 meseta from Scorpions and Owl Bears and fell prey to an overzealous Sworm. Packing a few Colas for emergencies isn’t a bad idea. Just keep in mind that this is the slowest part of the game… It all speeds up once you’re able to knock out Owl Bears in only a hit or two. 2. Scion and the SecretsScion is a port town to the east of Camineet, a welcome sight to those accustomed to the mundanity of the residential areas within the wall. There are a couple of suits of armor for sale here worth noting, although the only one you might be interested at present is the Light Suit.
The Light Suit is better than the Leather Armor that Alis started the game with, but nowhere near as good as the expensive Zirconium Armor. If you have an extreme excess of mesetas (500+) pick up a Light Suit. If not, don’t worry, it can wait. Things really get kooky at the Second-Hand Shop. Secrets? Huh? 200 mesetas seems to be a bit much for an unidentified item. Even so, an item like this must be imperative to the game, and it is. If you can’t afford them right now, head back outside and earn the necessary cash. At this point, you should be more than strong enough to take out groups of Owl Bears without a problem. Alis should have already learned the Heal spell, as well as the occasionally useful Bye spell. The next goal here will be to raise 300 mesetas to purchase the necessary legal accesories to let Alis play space-traveller. 200 of those mesetas will go towards “Secrets,” while the other 100 will make them worthwhile. Any attempt to purchase the secrets from the disgruntled shopkeeper in Scion will result in the his adamant refusal. On the third attempt, however, the shopkeeper gives in, and the Roadpass is yours. Take your newfound Roadpass and hike on over to either the west exit of Camineet or the north exit of Parolit and talk to the guards. They will bow to your new Roadpass and grant you access to the spaceport, where we’ll be spending that leftover 100 mesetas on a Passport. 3. Acquiring a Passport
You’ll see a couple of shops at the north end of the platform; the one on the left is a First Food Shop, while the other is a shop for acquiring a Passport. However! The woman in the Passport shop won’t just hand the Passport over. You’ve got to undergo a rigorous testing session to prove that you’re not some kind of diseased criminal. Woman: “You can file for a passport here. Do you want a passport?” Passport in hand, head left and speak with the guards. After being asked to show your Passport, walk up to one of the big red ships and hop aboard; we’re bound for the desert planet of Motavia. B. A new friend
Nekise’s contribution to Alis’ mission is about to come in handy as a crucial bargaining tool. Head north from the spaceport to the town of Paseo and stroll into the “shop” on the right. You’ll meet an odd guy who asks you if you’d pay 1 billion mesetas for the rare animal he has. Say no, then choose yes when he asks to trade for your Laconian Pot. Your new friend, Myau, also comes with a gift: a bottle of Alsulin that can turn the stoned (as in “turned to stone”) Odin back to flesh and blood. Odin’s exact whereabouts are a bit hazy, so check out the other shops in Paseo for now. If you’ve got the immediate cash, pick up some Thick Fur for your new pal, Myau. If you don’t have sufficient funds, don’t fret for now, but remember where the shop is. The Thick Fur is the only set of armor available for Myau in the whole game and ups his defense by a whopping 30 points. You can’t afford to pass it up.
The enemies found on the surface of Motavia are listed above. You’ll probably want to run from anything stronger than an E.Farmer, though you’re out of luck if you hit an Ant Lion’s nest; you go that one to the death. Just don’t step on the big blinking circles that dot the Motavian landscape and you’ll be super. On the other hand, if you’re feeling lucky and have all the latest equipment (and save every other step) you could try your luck at the E.Farmers that dwell just to the northwest of Paseo. If the battle isn’t going your way, just Talk to the little guys and work something out. They sometimes drop Colas, which can be a lifesaver in the field if you’re on your way back. While they offer gobs of cash, getting to the Barb(a)rians that dot the mountain pass to the north is dangerous and will likely end messily as these particular critters can’t be talked to and require a stronger party to down. C. Odin and the ShortcakeAfter arriving back at Palma, grab a Flash and a couple of Colas from Camineet and head southwest from the wall. That little thing that looks like a nut with stairs in it is the cave of Medusa, and is surprisingly gorgon-free.
1. Map: Medusa’s Cave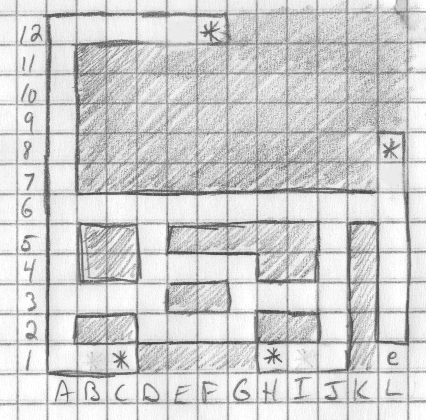 *C1 – Odin The first real cave of Phantasy Star is very straightforward and should only take a few minutes. When you find Odin, select the Alsulin from your ITEM menu and watch the drama unfold. Swing around the far corner, grab the compass, and return to Camineet to heal up at Suelo’s. You should have enough for the Thick Fur after Medusa’s Cave, so fly back to to Paseo to purchase it. Alis and co. are now in possession of the compass, and with it, a path to Eppi village. Make your way south from the wall and into the middle of the forest you see there.
2. The Dungeon KeyEppi village is located in the center of the forest, and besides having some good bits of information, it also has some good weapons and armor.
If you leave Eppi with only one new item in your possession, make it the Needle Gun. You’ll notice that the gun raises Odin’s ATK, but this will NOT be reflected in battle. The gun will always do 5 damage to every enemy. Pick one up for Odin, at least until you have enough money for a Ceramic Sword; the gun will allow Odin to do a decent amount of damage even in the face of his pathetic starting stats. Hunt the Were Bats of Eppi forest until you can afford one, but watch out — you’ll probably only be able to handle two at a time, maybe three if you enter at full strength and use up all of Alis’ Heal spells. But the main reason for your trip to this backwater village is to obtain a clue to finding the Dungeon Key. Speak with the old man in the house with the gold dome. The “outskirts of Parolit” that he speaks of is the warehouse where you obtained your first 50 mesetas. Once you trigger this flag, the chest ~magically~ appears back home. Head back to Camineet and enter the warehouse. Instead of making that first left, continue straight and pick up the key in a chest at the dead end. Now that you have the Dungeon Key you can plow through locked doors, although magically-sealed doors will have to wait. 3. The ShortcakeNow would be a good time to set up an audience with the governer of Paseo, but any attempts to do so will see you turned back by a robot demanding a gift. A nearby citizen hints that the man has a weakness for sweets, meaning we need to locate some sort of delicious tribute in order to meet with Paseo’s reclusive ruler. This is where the challenge of the game starts to pick up. The cave with the cake shop, Naula Cave, is four levels deep and houses a few tough monsters. The actual floors aren’t that big, but the cave’s twists and turns can pose a threat to players that lose their way. When in doubt, use your compass and try to approximate your location on the map provided. Make sure that you enter Naula Cave with 500 mesetas or more. It seems that the economy of the Algol system puts a high price on baked goods — it’ll run you 1000 mesetas for a Shortcake, half of which you should be able to make en route. To reach the cave, exit Camineet and follow the wall north until you see the shoreline, then follow that north to the cave’s entrance.
a. Map: Naula Cave1F 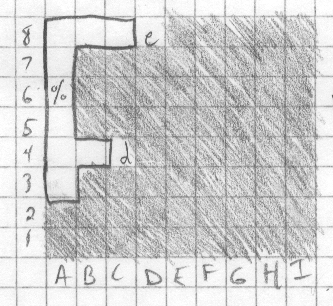 B1
B1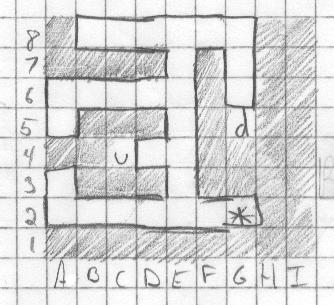 *G2 – Sht. Swd. (hang on to this) B2 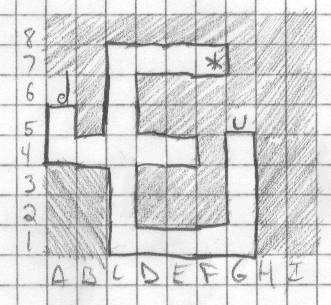 *F7 – 10 meseta B3 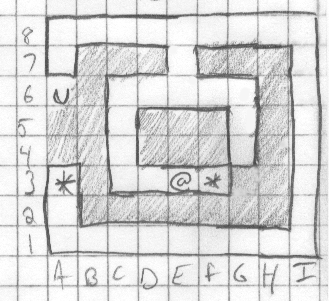 *A3 – Flash D. The Governor and Noah1. Meet with the GovernorEnter the cave in the middle of town and give the Shortcake to the robot. He’ll let you pass through. You will surface on an island in the center of town containing the Governor’s mansion and a free inn. Enter the mansion and speak with the Governor — he’ll give you a letter of introduction that we’ll later give to Noah to recruit him (her?). For now, he offers you a stay in the mansion. But it’s not the best night’s sleep, as the party is instantly plunged into battle with an ugly disembodied head called Saccubus. Don’t worry about trying to stay alive, because Saccubus will romp on you pretty hard. It’s not worth expending the resources trying to defeat him; your reward is a measly 10 exp. Regardless of who wins, the party awakens from the nightmare and sent on their way — be sure to pop into the free inn before leaving.
Once everyone’s healed up and you’ve saved your game, exit Paseo via the north exit and walk a few steps west, then up and east to circumnavigate the Antlions’ nests — stepping on those big brown circles will throw you into battle with one of them. Don’t worry if you accidently hit one, they’re not lethal at the levels you should be at. Follow the nests east until you see an opening in the mountains to the north. Walk up and head west into the mountain path, which is a winding one- way road to Maharu Cave, where our good friend Noah lives. Before entering, it’s a good idea to purchase a Ceramic Sword and Iron Shield for Alis (and one for Odin too if you’ve got the bling) as well as the Thick Fur for Myau.
2. Map: Maharu Cave1F 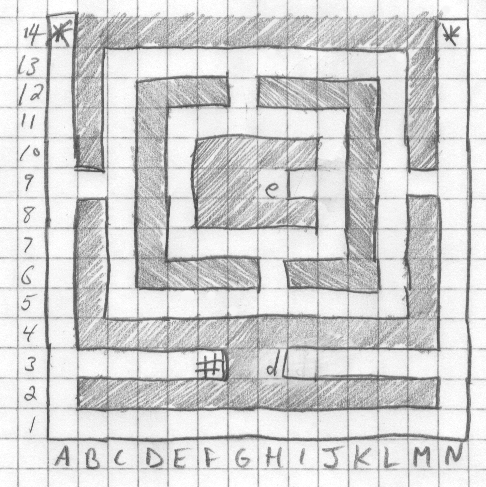 *A14 – 20 mesetas *N14 – Cola B1 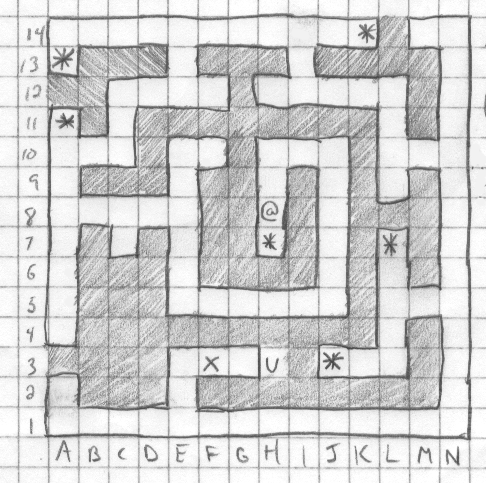 *A11 – Burger (exploding trap) Noah will turn you away unless you have the letter from the Governor, in which case he will join your party and tell you the next destination is the village of Gothic on Palma, where Dr. Luveno lives. But before we follow Noah’s instructions, let’s do a small side quest into Iala Cave and win a weapon for Myau. Return to Palma and prepare to do some shopping. Note: Okay, so the Governor of Paseo refers to Noah as a “she,” I still think it’s a dude, and that’s how this FAQ will refer to him… her… Noah. E. Bulking upTo conquer Iala Cave, it is strongly recommended that you purchase the following things: (the TRULY ambitious can outfit Alis and Odin with the 15,000 meseta Diamond Armor sold in Paseo, the best armor available to her in the game). Some of this you should already have from before the Maharu Cave, but if you don’t, make sure to buy everything now. Poor Noah has very little equipment in the game, so no upgrades for him are available just yet, save for the Short Sword you found in Naula Cave. If you sold it, pick up another in Paseo on the cheap. It’s only one point stronger than the Wooden Cane, but every little bit helps. In order of importance:
The fastest way to accumulate this cash is to fight the Were-Bats that roam Eppi forest. One battle with four of the bats will yield 44 Exp. and 252 mesetas. Don’t waste your time with the Fishmen that hang around by the beaches; they give the same amount of experience as Were-Bats, but not nearly as much money. On top of that, they’re harder to kill. Pass. If you think your party is advanced enough, you might also want to try hunting the semi-rare Barbarians on Motavia, en route to the Maharu Cave; a battle with 8 of the little guys will net you a hefty 712 mesetas. As you might’ve guessed, the cave is located south of Scion, on the eastern peninsula jutting out into the sea. It’s loaded with enemies, traps, and treasure, so come ready to fight. 1. Map: Iala Cave1F 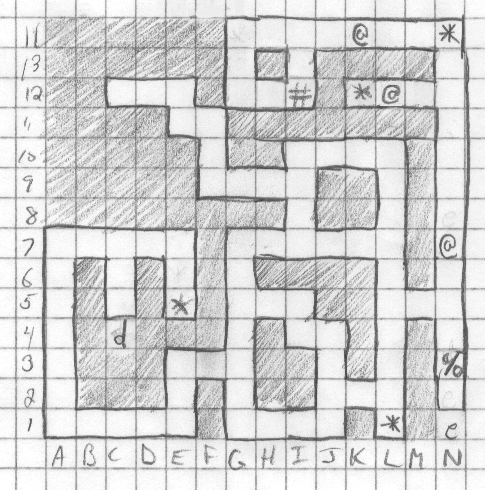 *C12 – 20 meseta B1 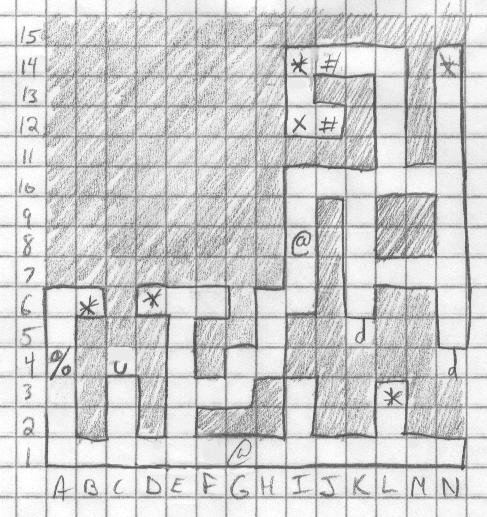 *B6 – 20 meseta B2 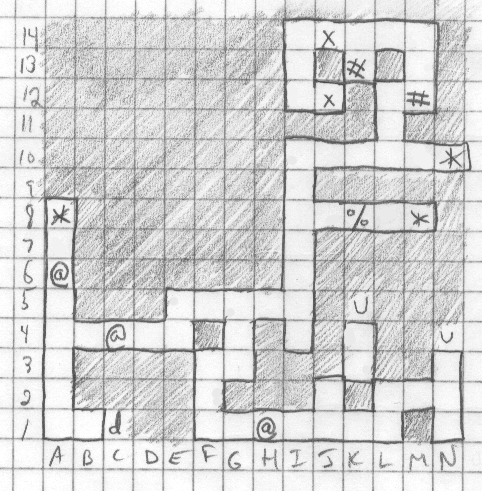 *A8 – 20 meseta B3 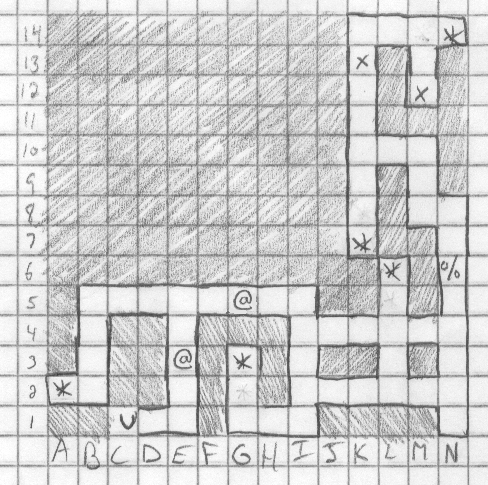 *A2 – Burger It’s not a bad idea to fall down all the traps on purpose for the purpose of finding the Iron Fang quickly, then working your way up, looting the place as you go. Battles will also be easier since Myau can actually do some decent damage now. Don’t worry if you don’t grab every treasure, just make sure you kill the Skeleton on B3 and grab the Iron Fang. Heal at Suelo’s and head to the spaceport. Head all the way to the left, past the guards, and down into the path leading to what looks like a wooden manhole cover. Noah must keep a crowbar or something under that cloak, because once he’s in your party the tunnel is accessible. Head through (the left turn leads to an antisocial man with no good advice) and come out into the Village of Gothic. You may encounter some Wing Eyes or Green Slimes in the cave, but they’re easy pickings.
F. The Luveno1. Village of GothicGothic is a quaint little town with one shop, a church, a hospital, and homeless guys littered about. A couple of them will ask you for Cola in exchange for information, but I’ve transcribed their comments below for the beverage-less. Bum #1: “Don’t go near the tower at the far end of the narrow road which goes from the gothic forest through the mountains. A magic beast lives there. Look at it and ya turn to stone.” Bum #2: “Thanks! This was once the lab of Dr. Luveno. He went bonkers, though, and be imprisoned in Triada to the south of here.” Our first homeless friend refers here to Medusa’s Tower, which we will tackle much later on to acquire Odin’s best weapon. For now, though, we’re going to follow the lead that Bum #2 gives us and attempt to track down this Dr. Luveno. The good doctor is our ticket to unrestricted interplanetary travel, so finding him is a top priority. Definitely pick up the Magic Lamp at the second-hand shop if you haven’t bought yours yet (just one will last for the rest of the game) and exit Gothic to the east (the bum on the western end turns you away for now). 2. Liberating LuvenoHead south, directly between the coastline and the mountains and take the first left you see. Follow the path all the way to Triada Prison and go inside. Don’t worry about battles, there are no random encounters and only two enemies in the prison. If you do the right things you can avoid them entirely.
a. Map: Triada Prison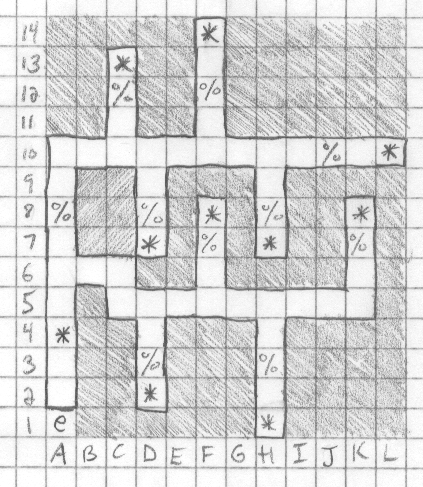 *A4 – Robotcop: “Do you have your Roadpass?” Don’t worry about talking to all those prisoners, the only one you absolutely need to see is Dr. Luveno in the cell on space H7. Once he turns you away, reenter twice to finally convince him that you’re serious. He heads back to Gothic, and we should too. There is a pair of adjacent houses in Gothic (the two in good condition); you’ll find Luveno in the one on the left. He tells you that his assistant is missing, probably still in the underground passageway. Head into the tunnel via the destroyed dwelling in the upper right and take the first (and only) right you see. Talk to the uppity young man in the room and he’ll agree to help the Doctor build your spaceship. 3. Ship and PilotBack at Gothic, Luveno tells you that he requires a fee of 1200 mesetas, which you should have already built up. Give the Doctor his cash and pop in on the assistant if you like (he turns right back into a jerk), then reenter the Doc’s house two or three more times until he tells you that your new ship (The Luveno!) is completed. But d’oh! He points out that you don’t know how to fly a ship, that you need to find a robot names Hapsby (which you may remember one of the prisoners in Triada mumbling about). Exit Gothic again in search of Hapsby.
Head south and follow the coastline, this time all the way around the mountains until you see a bubbling brown field of goo. Trudge through it (it’ll drain 2HP each step; it should only take 16 steps to get through to the northwest side) and into the abandoned town of Bortevo. Bortevo has only one citizen, but he gives you the only clue you need: there’s a usable robot hidden in one of the houses. The only problem is that it’s buried under mounds of junk, meaning we’re stuck for now. Exit Bortevo and enter the nearby tunnel which will take us across the water to a couple of new towns. a. Map: Tunnel to Loar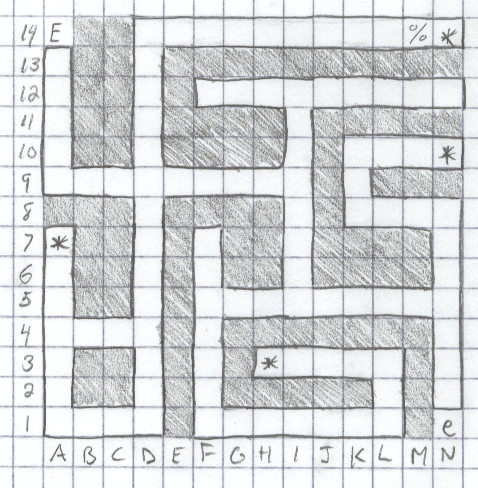 *A7 – Flash This cave is simple if you follow the map, but it can be easy to lose your place. Once you get out, head east and walk between the coastline and the rocks. Follow this winding path until you come out into another open area.
When you leave the coastline, head east into the village of Loar.
Make sure to pick up a Silver Fang; it’s the best weapon available to Myau in the game. You can spend some money on the Heat Gun, but be aware that the strongest gun in the game will be available very soon, and money’s going to be tight. Heal up at the hospital (use up all your curative magic first to save cash). Exit Loar and head north past the mountains and then all the way west to the town of Abion.
There are three things in Abion that you must leave with, two of which can be purchased. We’ll need the Polymeteral from the First Food Shop in order to find Hapsby, and we also need the Laser Shield from the Armory for Noah; it’s the only shield he can equip, so it’s going to last him till the end. It’s only essential for you to pick one up for Noah at this point, but if you have enough for more (yeah, right), get some for Alis and Odin. The third item will require you to get your hands a little dirty. A crazy doctor lives on an island in the middle of town, and this doctor is in possession of a Laconian Pot (like the one we used to trade for Myau) which we’ll need later on to acquire a key item. Enter the path just to the left of the entrance and follow it into the cave that leads to the island in the middle of Abion. There are no enemies in the cave, so feel free to grab the treasure if you like. b. Map: Tunnel to Dr. Mad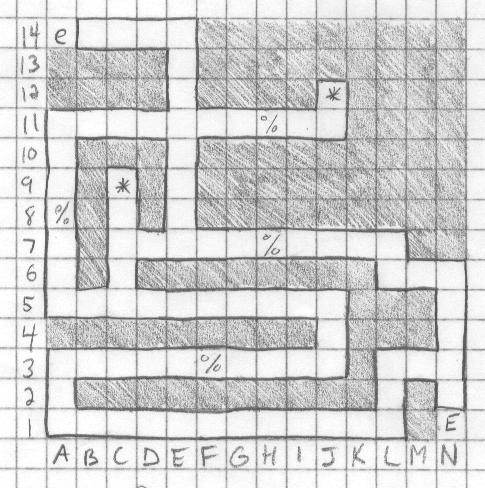 *C9 – 20 mesetas Upon exiting the tunnel, SAVE YOUR GAME and walk right into the only house on the island and speak with the mad doctor him(her?)self. He will ask to see Myau; say no and the fight will commence. If you choose yes, Myau will be killed on the spot and you’ll be thrust into battle without him. Avoid this.
It’s a tough fight, as Dr. Mad’s, uh, stomach-cannon can do as much as 100 points of damage to any character every turn. Myau should Cure anyone who gets hit while Alis and Odin pummel away. Noah should have the Wind spell, so be sure to cast it every turn. Don’t be discouraged if you die a few times, this guy is really tough. It might be wise to buy Laser Shields for Alis and Odin, but it’s not necessary; I managed to beat him without them (and lots of Curing). Once he’s down, grab your new Laconian Pot and head back through the tunnel. Double check to make sure that you bought the Polymeteral and at least one Laser Shield and backtrack back to Bortevo; it’s quicker if you cast Alis’ Fly spell (assuming the last church you visited was in Camineet) and walk back. Once back in Bortevo, go into the only house with a door (a blue door, to be exact) and select the Polymeteral from your inventory. The pile of garbage will dissolve, and the hardheaded Hapsby emerges. Take Hapsby and head back to Gothic. After meeting with Dr. Luveno and showing him your latest acquisition, the bum on the west side of town will let you pass through to where your ship is. Page Nav: « Previous ◊ Next » | Crunk Games is a game site about nothing. Read more anyway » Feed Editorial Review Game Index Dreamcast Archives 2025 5 Random Links |
|||||||||||||||||||||||||||||||||||||||||||||||||||||||||||||||||||||||||||||||||||||||||||||||||||||||||||||||||||||||||||||||||||||||||||||||||||||||||||||||||||||||||||||||||||||||||||||||||||||||||||||||||||||||||||||||||||||||||||||||||||||||||||||||||||||||||||||||||||||||||||||||||||||||||||||||||||||||||||||||||||||||||||||||||||||||||||||||||||||||||||||||||||||||||||||||||||||||||||||||||||||||||||||||||||||||||||||||||||||||||||||||||||||||||||||||||||||||||||||||||||||||||||||||
| © 2003-2011 Crunk Games. All rights reserved. To Top | Home |