
|
🎙️ The Crunk Games Story
|
 |
|
||||||||||||||||||||||||||||||||||||||||||||||||||||||||||||||||||||||||||||||||||||||||||||||||||||||||||||||||||||||||||||||||||||||||||||||||||||||||||||||||||||||||||||||||||||||||||||||||||||||||||||||||||||||||||||||||||||||||||||||||||||||||||||||||||||||||||||||||||||||||||||||||||||||||||||||||||||||||||||||||||||||||||||||||||||||||||||||||||||||||||||||||||
|
July 12th, 2003 | Feature | Master System
Page 3 Contents G. Bulking up redux Now that we have access to all three planets, it’s a good time to begin hunting for some better equipment. Out of the following list, the top two items are strongly recommended; splurge on the rest only if you’ve got the the money or the desire to earn it. In order of importance:
1. DezorisApproach the Luveno and Hapsby will ask you for your destination; we obviously can’t go to Gothic since we’re already there, and we don’t want to go to Uzo on Motavia just yet, so select Skure from the list so that we can finally visit the third and final planet of the Algol Solar System (and pick up Noah’s best weapon if you like). After you land, enter the cave nearby and follow the path to the end. Note that the Evilheads give a buttload of money; it might be a good idea to hang around and knock a few down.
Greet the locals in the subterranean town and head for the shops. We’re here primarily for Odin’s Laser Gun, with Myau’s Gloves next and Noah’s Wand at the bottom of the list. If you want some variation, feel free to head aboveground and try your hand at some of the native monsters on the surface of Dezoris (much like the Evilheads, the Dezorians are loaded). You’ll notice that the Second-Hand Shop sells Spheres; these allow you to communicate with some monsters but is more powerful than Alis’ Chat spell (and equal to Noah’s Tele), but still pretty much useless. Let’s go outside.
Be sure to purchase the Laser Gun the second you can afford it; it will help tremendously with raising any more cash you might need. Don’t forget that Noah can cast Cure out of battle! For this reason it’s also practical to keep his in-battle casting to a minimum. After you’ve purchased everything necessary in Skure, head back to the Luveno and tell Hapsby that you’d like to visit Uzo. 2. Motavia revisitedAll we really need from Uzo is a Light Saber for Alis if you want (you can coast through the next couple of dungeons with the boring old Ceramic Sword with no trouble) and some choice bits of information from the citizens; they say that there is a town called Casba to the south and that the dragons that live in the cave have giant gems in their heads. Worth checking out!
After Alis goes Jedi (DUDE IT’S A SCI-FI RPG I HAVE TO MAKE ONE STAR WARS JOKE) exit Uzo and go south until you see the initials “T.K.” written in cacti (don’t ask me why). Head left until you reach a lake with cave on its underside. This is the aforementioned Casba cave, which holds a key item and is the only way to Casba Village. a. Map: Casba Cave1F 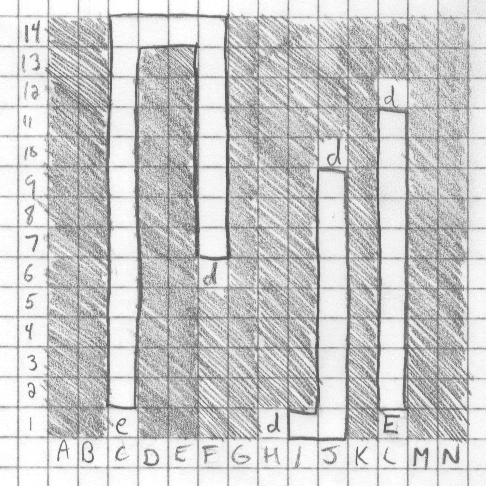 No items/events B1 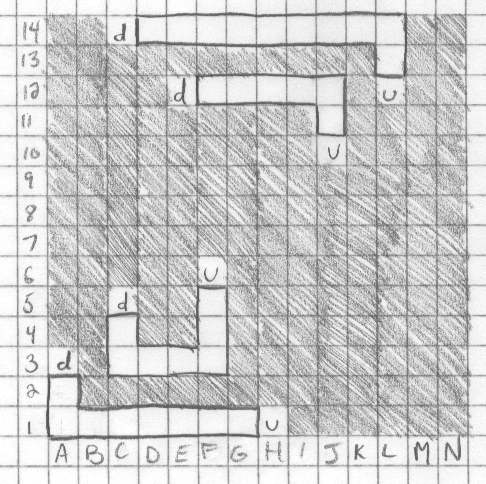 No items/events B2 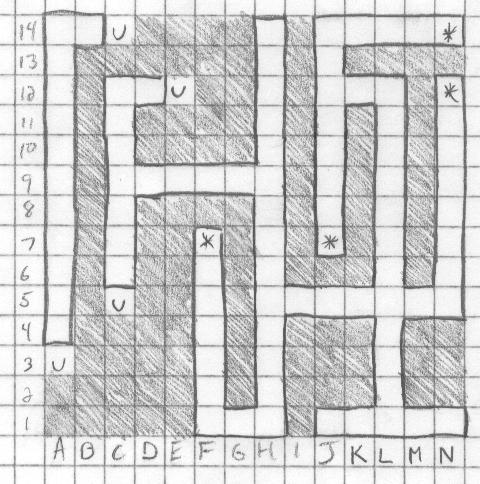 *F7 – 100 mesetas Be sure to take the right turn the first time the cave branches off; this leads to the Casba Dragon, whom we need to kill to acquire the Amber Eye for trade later on Dezoris.
A decently difficult boss. Have the fighters hack away while Noah casts Wind and it should be over soon. You can pick up a bit of information and simultaneously flee the battle with Noah’s Tele spell; the dragon tells you that “a nut of Laerma needs special light to grow.” Something important to remember for later. Slay the dragon, grab the Amber Eye, and continue on to Casba.
There are two very important things to do here: 1) Purchase the Landrover from the Second-Hand Shop on the right. This six- wheeled behemoth allows us to travel over the Ant Lions’ nests and access the entire land surface of Motavia. If you don’t have the 5200 mesetas, hunt around inside the Casba Cave until you do. 2) Just above the pair of Second-Hand Shops is a pair of houses. Enter the one on the right and speak with the man inside. He will ask you if you’ve ever heard of the Hovercraft; tell him Yes and he’ll explain that he bought one in Scion and abandoned it in Bortevo. The guy sets off a flag, so you’ve got no choice. 3. The Flute and the Gas ShieldOnce you’ve done those two things, return to Uzo and enter the house next to the church. Answer No when the man asks if you’ve heard of the Magic Flute, and he’ll tell you that he buried one in the outskirts of Gothic Village (what is it with Motavians ditching all their junk on Palma?!). Fly back to Gothic and search in front of the tree in the cul-de-sac in the southwest corner of town. This Flute will come in handy — using it in battle may put some enemies to sleep, but the real kicker is that using it out of battle will warp the party outside the current dungeon. Extremely handy. Flute in hand, Leave Gothic through the east exit and head south and around the mountains, through the marsh to Bortevo (you can try out your now Landrover if you like, it’s faster than walking). Upon entering Bortevo, walk into the house nearest to you and use the Search command to uncover the Hovercraft. Hapsby restores it to working order, giving you unrestricted access to most of Palma and Motavia. Like the Landrover, the Hovercraft must be selected from the item menu, but only when the party is standing adjacent to a body of water. The only new enemy you might run into is the Wyvern, a variation on the Serpent.
Once in the water, head directly west and take note of the tower sitting on a nearby island; Remember this location, but continue west for now until you see Iala Cave. Curve underneath the peninsula and head directly south until you see a town floating on the ocean. Disembark the Hovercraft (same way you embarked) and enter the town of Drasgow with at least 1000 mesetas (knock around a few Were-Bats in the nearby Eppi Forest if you need a little more). The town doesn’t have any shops, save for one merchant hidden in a cave. The man sells a key item that will enable you to earn both Odin’s best weapon and best shield in the game. There are no enemies in this merchant’s cave, so don’t worry about being prepared for battle. a. Map: Gas Shield Shop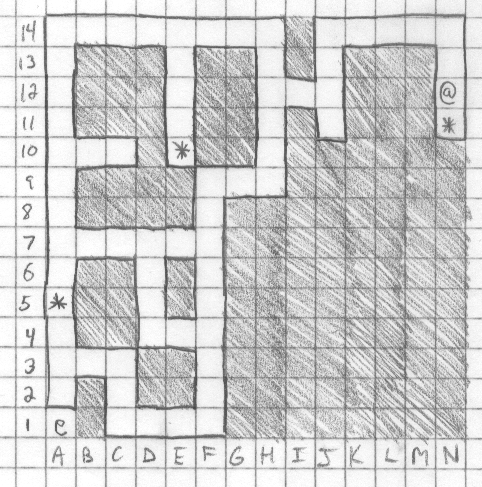 *A5 – “I heard that they sell gas shields here but I don’t know where the shop is! What a mess!” 4. Sopia and the Mirror ShieldReturn to Uzo via the Luveno. Exit town and get in your landrover. Head east across the desert until you hit the mountains, then go north and follow the coast to a green field. These are the gas fields of Sopia, and the enemies that thrive within the gas are lethal. Be on guard for the Horsemen, Reapers, and Sorcerers.
Not far into the field is the town of Sopia, an impoverished little village with only a hospital and a few houses. Enter the house on the far left of the second row of houses and pay the mayor 400 mesetas. He will tell you that the very shield used by Perseus to slay Medusa is buried on an island in the lake — note that paying the old man 400 mesetas for his information is a flag and must be done in order for the shield to appear. Make sure to visit the other house in the second row and tell Miki how much you love Sega games. Exit Sopia and walk east until you hit the shoreline. Climb into your Hovercraft and continue east to an island with an Ant Lion and several cacti on it. Disembark and walk to the southmost space on the island; from here, walk up one space and right one space. Search here for the Mirror Shield, the strongest shield available to Odin and the easiest way to defeat Medusa. Equip it on Odin. Now would be a good time to buy that Light Saber for Alis if you haven’t already. 5. Medusa and the Laconian AxeReturn to Palma and heal up. Head for Gothic, then exit and walk west for a few steps and directly south into the mountains. Follow the path to the tower at the end and enter. Odin’s going to finish what he started with the help of the rest of the party.
You can easily avoid the pitfalls with the map, but be extra careful not to fall (or accidently walk!) into the basement; that’s where the Titans, Sorcerers, and Horsemen live, and they’re tougher than anything on the upper floors of the tower. The Sorcerers (and Marauders, found on the upper levels) can use the devestating Thunder spell, so don’t be afraid to turn tail and run away if you encounter one. Their Thunder is just as potent as Noah’s, 30 damage to every party member. Ouch. a. Map: Medusa’s TowerB1 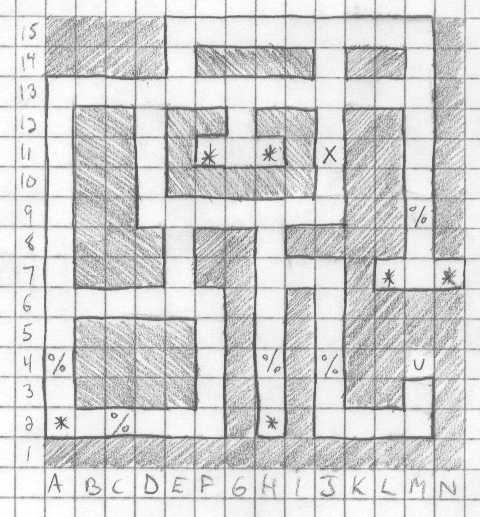 *A2 – 10 mesetas 1F 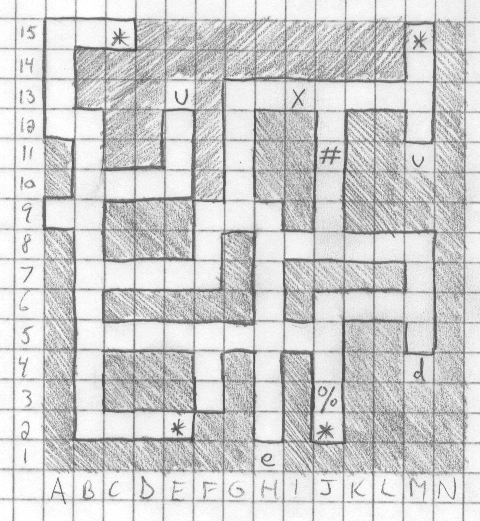 *C15 – 20 mesetas 2F 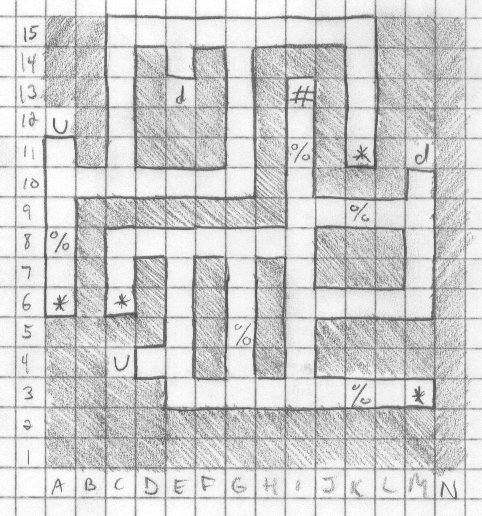 *A6 – 5 mesetas 3F 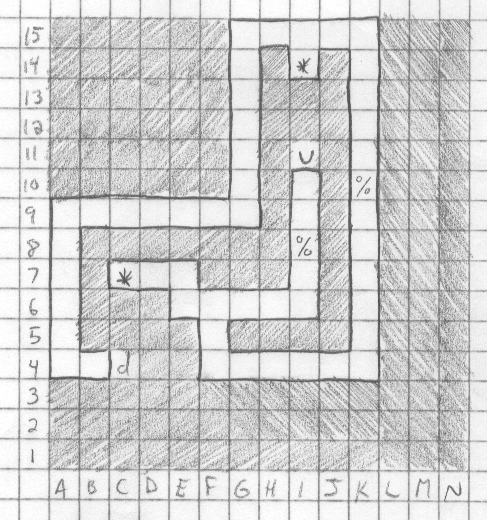 *C7 – empty (exploding chest) 4F 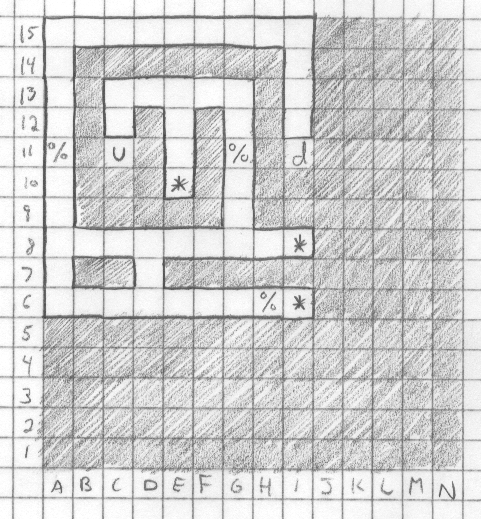 *E10 – Burger 5F 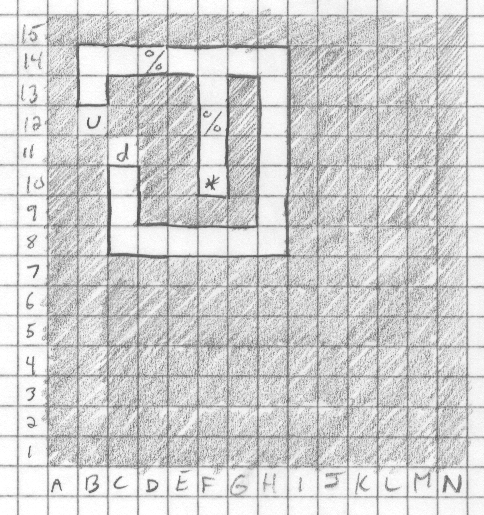 *F10 – fight w/GiantFly (no special treasure) 6F 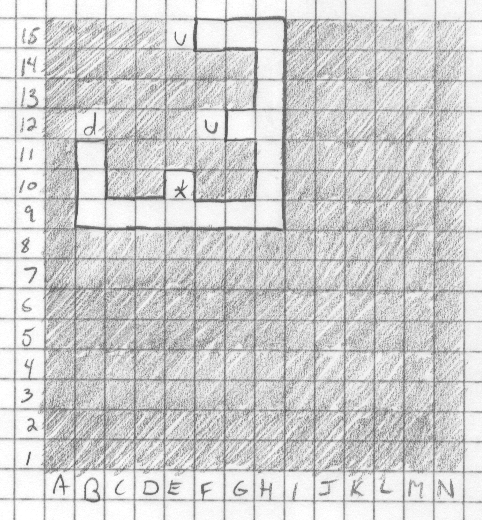 *E10 – Cola 7F 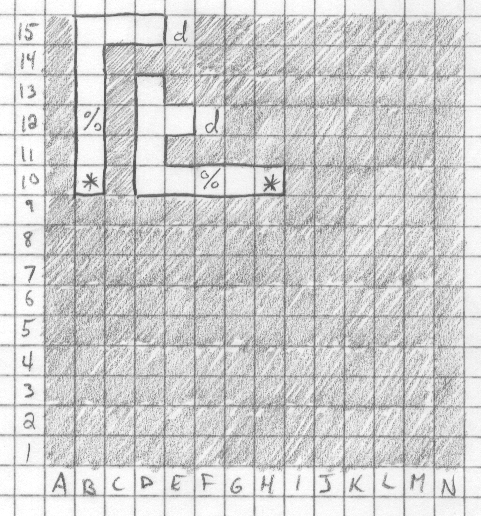 *B10 – empty (spear trap)
This isn’t a difficult battle as long as Myau has enough MP for a few rounds of Cure. Alis and Odin should attack as usual, and Noah should cast Wind. He may have learned Thun by now, but against a single enemy Wind does the same damage for fewer MP. Medusa will leave behind the fabled Laconian Axe. Use the Flute to warp out of the tower and return to Camineet to stay at Suelo’s Laconian Axe vs. Laser Gun: A lot of guides recommend the Laser Gun for Odin’s final weapon, and I can see their point. It’s got 100% accuracy, and 20 damage on any enemy in the game isn’t too shabby. But! If you’re fighting against normal enemies later in the game, the Axe has its uses. Enemies towards the end of the game tend to only appear in 1’s and 2’s, meaning that the potential of the Laser Gun can’t be fully exploited. A level 30 Odin armed with the Laconian Axe, on the other hand, can do upwards of 60 damage per hit on some of the later enemies, outperforming the Laser Gun especially against single enemies. Both weapons are excellent choices, and you can honestly choose either one without experiencing much more difficulty or advantage. Personally, I prefer the Axe because it’s his final weapon! Poor Odin got turned to stone and had to be rescued by Alis and Myau before getting a rematch with the gorgon. Let him enjoy his prize! 6. The Laconian SwordOnce fully healed, exit Camineet and walk to Scion. Embark the Hovercraft close by and head east until you reach a small island with a tower. Disembark and head inside. a. Map: Floating Tower1F 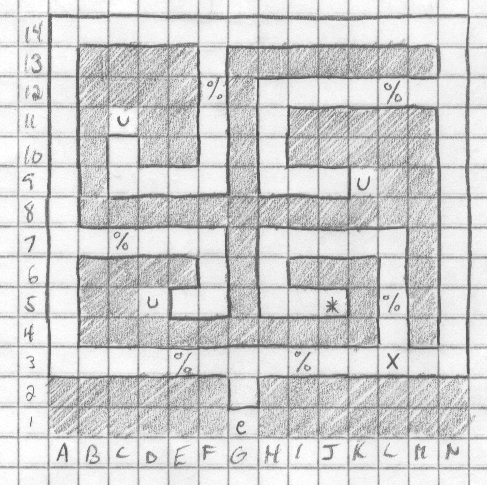 *J5 – 20 mesetas 2F 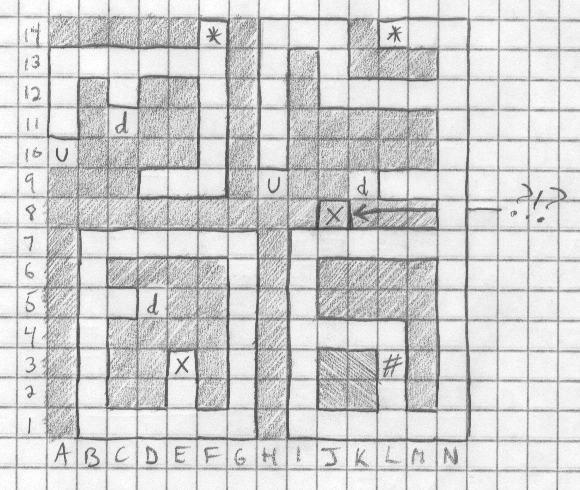 *F14 – empty (spear trap) 3F 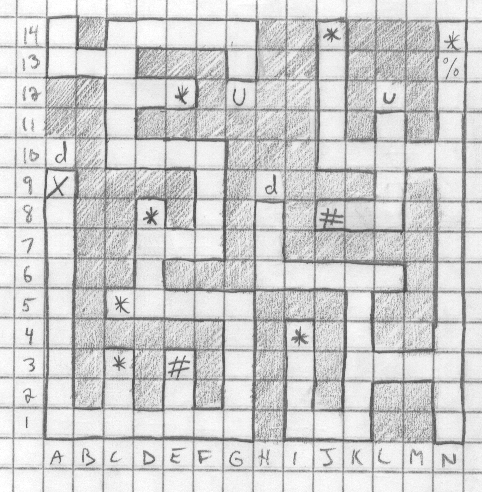 *C3 – 1 meseta (WHOA THERE UNCLE MONEYBAGS) 4F 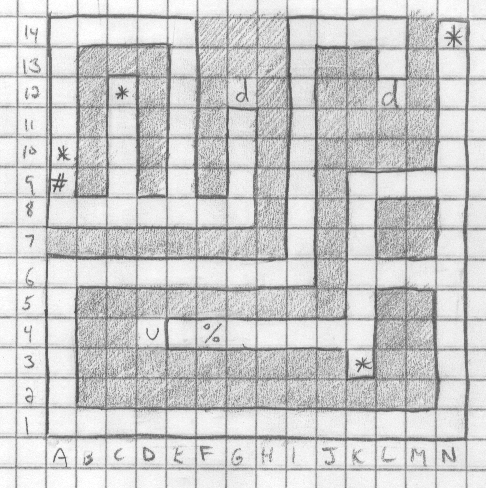 *A10 – Burger 5F 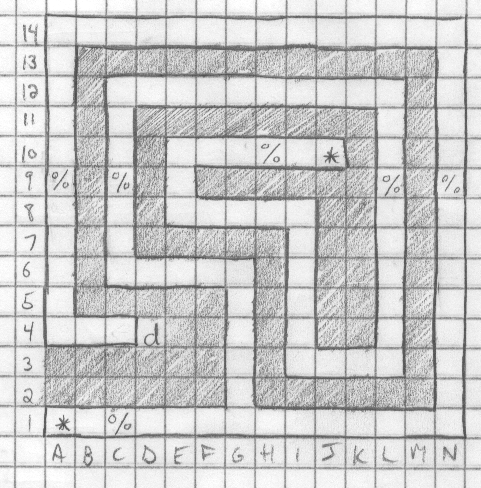 *A1 – Burger
7. The Frad MantleNow that your party has the best weapons in the game, it’s time to concentrate on armor, and who better to give a defensive lift than poor Noah? If you haven’t purchased that Wand for the mage, do so now. A Laser Shield is also necessary, although this should’ve been purchased on your first visit to Abion. From Camineet, head to Gothic and from there, Uzo. Exit and pile the group into the Landrover. Trek east across the desert and over the Ant Lions until you hit the mountains, then go north until you see the lake (this is also the path to Sopia thus far). Now, ride up next to the lake and switch to the Hovercraft. Float east a few spaces and then head south and dock between the mountains. Continue south on foot until you reach a cave.
Since Noah’s going to fighting the upcoming boss all by his lonesome, keep his magic use to a minimum, just for out-of-battle healing. Make sure not to go below 48 MP, as that should be enough for the boss. a. Map: Tarzimal’s Cave1F 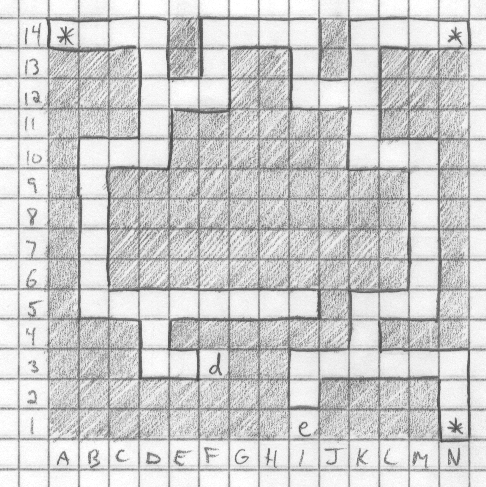 *A14 – White Mantle B1 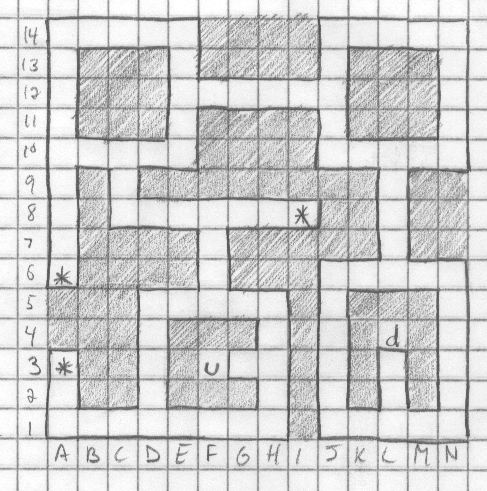 *A3 – Burger B2 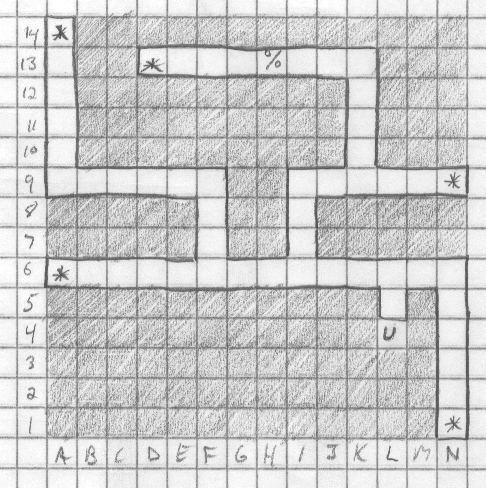 *A6 – empty (exploding trap)
After 4 rounds of Wind, Tarzimal should either be dead or close, and a whack or two from the wand should finish the job. His offensive power is low, so don’t be concerned about healing. If he gets in a lucky hit, a burger should be all you’ll need. Once you’ve won, Tarzimal hands over Noah’s best armor, the Frad Mantle. Equip it, and now Noah’s got all his best equipment. Use the Flute to exit, but don’t cast Fly just yet. Walk north until you reach the lake, then board the hovercraft and head east. Continue until you hit the eastern shore, where we’ll dock and walk into Paseo. Remember Paseo? The Diamond Armor? 15,000 mesetas? You should have more than enough after these past two dungeons. Pick up a suit of the stuff for Alis, leaving only the Laconian Armor and Shield to find before your party is entirely pimped out and ready to face Lassic. 8. The Laconian ArmorOnce you’ve healed up, fly the Luveno to Skure on Dezoris. Exit and walk east until you hit the ice mountains and then south until you see a cave. This is the first of several ice caves connecting the different areas of Dezoris. a. Map: Ice Cave 1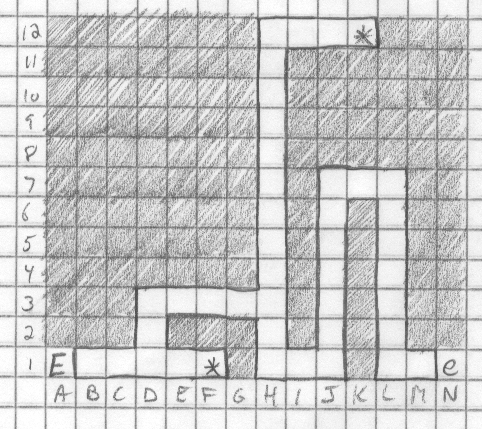 *F1 – 100 mesetas When you emerge, you’ll be in a small clearing in the mountains with another ice cave nearby. Step right on in! b. Map: Ice Cave 2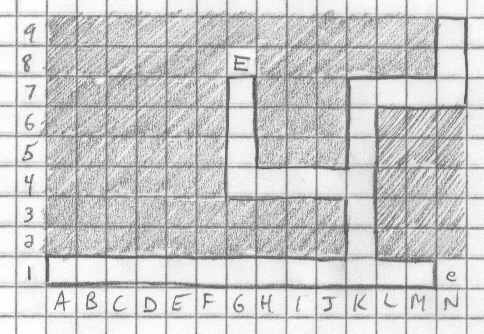 After exiting the second ice cave, head north and west to reach yet another ice cave.
c. Map: Ice Cave 3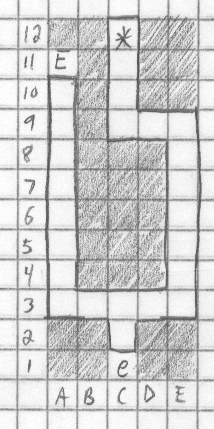 *C12 – empty (exploding trap) Once out in the open, walk northeast until you see a fourth ice cave. While it won’t lead directly to the Laconian Armor, we’re going to use it to make a side stop to pick up a key item needed to acquire the Laconian Shield. d. Map: Ice Cave 4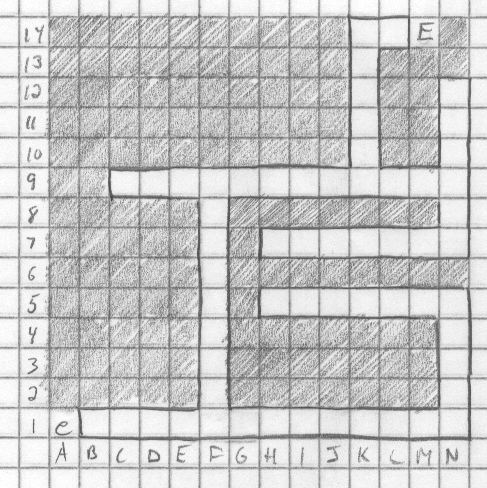 No items/events Exit the cave and enter the town nearby. It turns out you’ve got to go through another cave (just like getting to Skure), but the enemies are the same as the Skure cave and it should only take a minute or two. You will surface in Twintown, famous for it’s Palman-hating Dezorians. It’s not all bad, though, as one of the nearby Second-Hand Shops contains our last major purchase. Take note that the localizers chose to give the Dezorians hilarious French accents.
We’re really here for the Ice Digger, but feel free to gather information from the left side of town — the citizens on the right are outright liars. If you need more money for the Ice Digger, head back outside and hunt the Evilheads near town. Once you’ve made your purchase, leave town and backtrack to the plains between the third and fourth ice caves. Walk directly above the exit from Ice Cave 3 and follow the mountains northwest along path, straight into Guaron Morgue. e. Map: Guaron MorgueLike all morgues, Guaron is populated entirely by zombies, whose torturously long attack animations are far more threatening than their rotten maws. This dungeon is ridiculously easy if you pay careful attention to the map; there is a trap that Myau MUST disarm (*I8) before you can collect the Laconian Armor. There are also a few set fights with zombies in some of the dead-ends, so… stay out of the dead ends! You can tell that these are set fights because walking into these dead-ends backwards forces the party to turn around and enter battle, something that happens only in these instances. If you stick with the map of the first floor, you shouldn’t even need to use the basement map. Once you equip the Laconian Armor on Odin, Flute out, and if you think your party needs a heal, trudge back to Twintown and do so. 1F 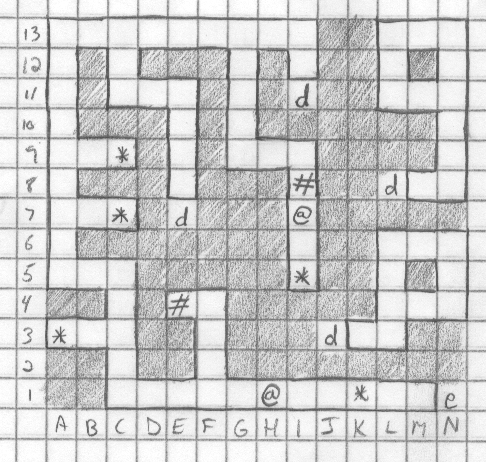 *A3 – fight w/Zombie (no special treasure) B1 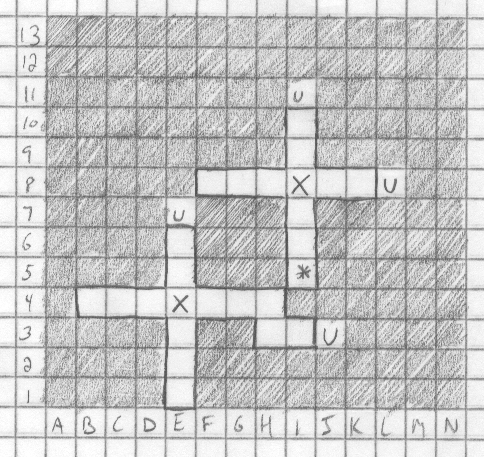 *I5 – Burger Now, if you think you’re in good enough shape to handle a small dungeon nearby to grab the Aeroprism, embark the Ice Digger and head south and turn west as soon as you can. Keep going southwest until you hit the mountains, then keep going! You’ll plow right through those bitches thanks to the Digger. Keep digging to the southwest until you reach a cave, the Ice Dungeon (for lack of a better name). Page Nav: « Previous ◊ Next » | Crunk Games is a game site about nothing. Read more anyway » Feed Editorial Review Game Index Dreamcast Archives 2025 5 Random Links |
|||||||||||||||||||||||||||||||||||||||||||||||||||||||||||||||||||||||||||||||||||||||||||||||||||||||||||||||||||||||||||||||||||||||||||||||||||||||||||||||||||||||||||||||||||||||||||||||||||||||||||||||||||||||||||||||||||||||||||||||||||||||||||||||||||||||||||||||||||||||||||||||||||||||||||||||||||||||||||||||||||||||||||||||||||||||||||||||||||||||||||||||||
| © 2003-2011 Crunk Games. All rights reserved. To Top | Home |